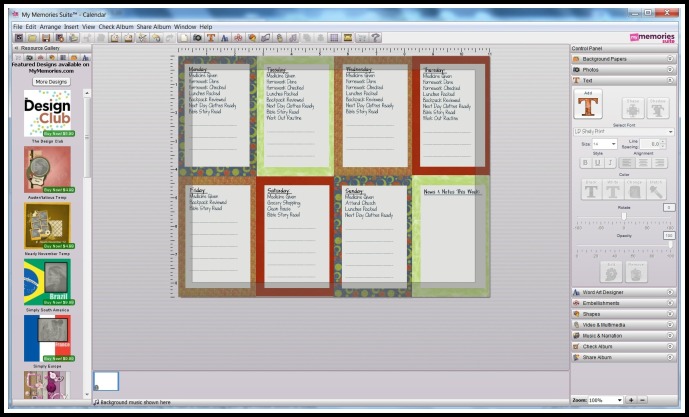
When I was a kid I remember seeing this long and skinny clipboard that used to lay around the house. It had a clasp shaped like a wooden hammer and that clasp held a pad of paper with words scrolled across the top saying “Honey Do …” For years I used to think my folks were so very odd because they had a pad of paper that talked about green cantaloupes. Ha! I promise that is a true story!! I guess I associated the words “Honey Do” with one of my favorite fruits “Honey Dew Melons”. Hey, I was like 10 years old. Don’t laugh … you know you have stories like that too!
Anyhoo, that memory actually played a role in today’s project post.
School is back in session folks. And with that comes mucho moro responsibility for me.
Ummm, yeah. Just what I need, right. Remember this post?? I’m the hamster, remember? And with this busy schedule if we want to keep peace in our home then we have to have a way to get the family to help out around the house. Don’t you know “If Mama Ain’t Happy Ain’t No One Happy”.
What to do? My Memories Software to the rescue!! Let me just say the more I use this program the more in love I am with it. My software is loaded on my laptop … and with laptop in hand while sitting in the car during lunch … I was able to do this New-Fashioned Honey Do List in less than 1 hour. Now that’s effective time management … now to get the family to actually use it … we’ll see.
Here’s how I did it:
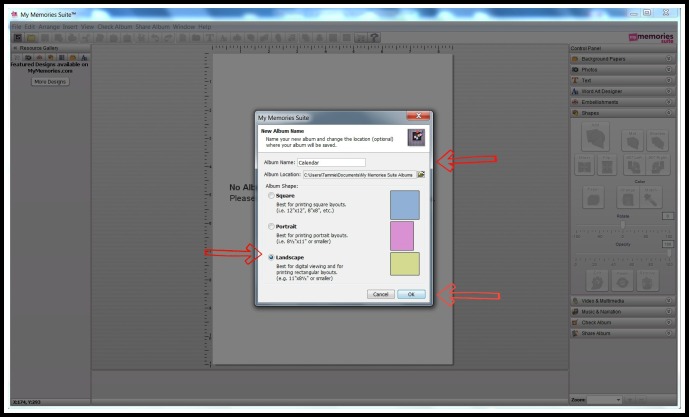
Open the My Memories Software; Choose Design Your Own Design; Name your Project; then choose “landscape” for your option and click OK.
Next up, choose the background. I wanted to use some papers I knew I had in my private stash so I needed to add them as an embellishment. I’ve learned that choosing background will place the paper totally across the background of your page and you can’t edit the size. I needed to be able to edit the size. So embellishment it was.
I knew what I wanted the final thing to look like so I knew I would need 4 different papers. I picked the first one that I liked and then picked 3 others that matched. Some came from the FREE My Memories collection and some came from my personal stash.
To get the paper from your personal stash open the “flower” tab which means embellishment. Then you choose browse other and it opens a window that allows you to choose your paper and place it inside the document.
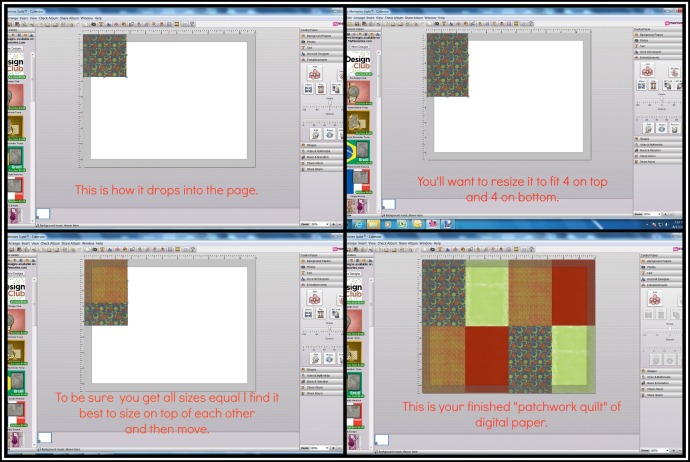
Now your first paper is placed. You’ll need to click on one of the squares along the edge of the paper and, using the ruler guides, drag it until it is 4.25″ x 2.75″. Then repeat this step for all eight papers. I find it’s easier for me to get all papers to match by sizing them on top of each other and then moving them around. Just my crazy way of doing things … you may have a better way.
Now, that part is done. Next up is the text.
Choose the text option. A frosty color box appears. Simply type your list of things needed to be done for the first day. You edit the size, the font, the color, and all that jazz in the text option box on the right hand size of the screen. Repeat this step for all 7 days. I had an 8th square so I just made it a section for notes and such.
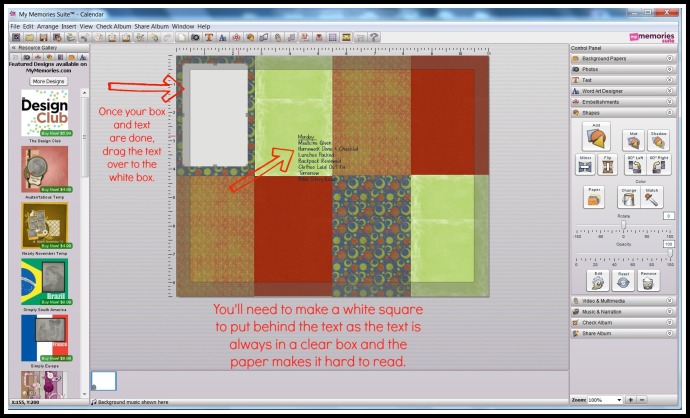
You will notice that your text will be on a clear background and very hard to read because of the digital papers. DON’T PANIC … not that I did or anything … I never panic … I’m just preparing you to not panic.
To fix this issue that may or may not have freaked me out … you’ll need to create 8 white squares to go behind the text. That is done by selecting the shape option feature on the right hand side and then choosing square. Again, as with the text option, you can edit the square with all sorts of options on the right hand side.
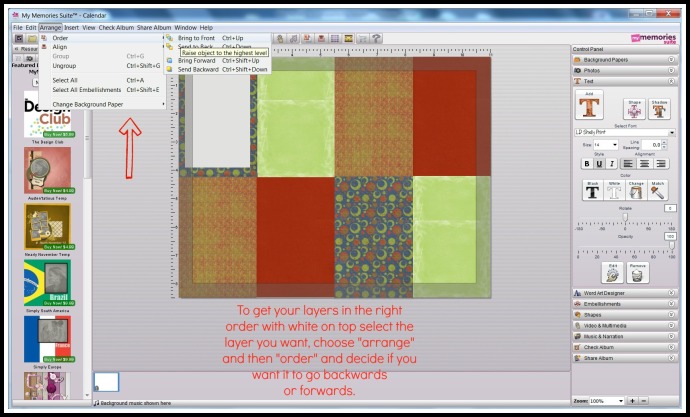
You may notice that possibly your white square box is not be on the top layer.
You may notice that when you move your white square box around that it might perhaps disappear behind one or two papers.
Again, DON’T PANIC. Not that I did … did I mention that I never panic … I’m just again preparing you. It’s easy to fix this issue. Simply click on the white square causing the problems and choose arrange; order; and bring to front on the file menu. Do the same thing to your text layer BEFORE you move it over onto the white square and size it to fit.
Once you have all your paper boxes, and all your square boxes, and all your text boxes finished this is what it will look like:
Now my friends, you could stop there and print this out and move on to the final step. It will work just fine and look just fine too. But I am too OCD for that. I needed to make it look more finished. So I added some thick black lines. That is done by using the shape option box on the right hand side in the same fashion that you did the white squares.
Add your black lines to where all the papers connect and create a grid type of thing. When done it will look like the picture below. Now you are ready to print.
Seeing as I was not 100% sure what size the page was I had just created I got a little funky with my printing. I first made this image a jpeg by using the share album option on the right hand side. Then I opened it in some Windows program and printed it that way so that was guaranteed to get 8.5×11 size picture.
Once I printed my page I put it behind glass in a basic wooden frame that I had bought from the Dollar Store. I then hung it up next to my son’s chore chart and we were good to go. A perpetual “Honey Do” list that you simply use dry erase markers to edit. Now the whole family can easily know what I need help with each day and joyfully – tee hee – join in and ‘get-r-done.
**Update since I started typing this** We’ve used this now for the past 3 days and I must say it works quite awesomely (is that a word?). My nights have gone smoother and because of this list I actually have had time to read my Bible and have a quiet time for THIRTY minutes each morning. Now that is what I’m talking about!! It makes me think of that famous saying “Many hands make light work.”
If you are interested in getting the My Memories Software for youself … be sure to check out their website here. And if you use the code STMMMS36909 at checkout you will get $10 off the total purchase price AND $10 gift certificate to buy some goodies.
Oh, and if you are wondering about my son’s chore chart … that post is coming up soon my friend! Another easy thing I did that works GREAT! What about your family?? What types of methods do you use for staying organized??

